Haven't used the Haynes much over the last couple of months.
Managed to get out on a couple of rare rain free days recently, but discovered light rear wheel drive cars, rubbish donor tyres, and cold/damp roads do not a good combination make.
Unless of course you like going sideways everywhere, even when you're not trying to!
That and the fact my tax runs out in a couple of weeks time means she'll be tucked up in the garage till spring now whilst I save up for some decent tyres.
Saturday 14 December 2013
Saturday 31 August 2013
Spring Rates
When I first ordered my shocks and springs I went with the springs rates suggested by NTS:
400lbs/inch front
250lbs/inch rear
Initially these felt ok, but the more I drove, and the more confident I got, the more clearer it became that something wasn't right with the handling...
I found that the ride was pretty poor on bumpy roads (and we have a lot of bumpy roads round here...), and I was getting jolted about all over the place.
More importantly though, the car had disasterous understeer when pushed to the limits of grip.
It was very difficult to get the tail out, and when I did it'd very quickly switch between under and oversteer resulting in some funky handling.
Another indication that something wasn't right was that the tyres squealed like a pig going round tight corners, even when I wasn't pushing it hard.
After spending a while playing with ride heights, damper settings, camber, and toe, and not getting anywhere I decided to do a bit of research on spring rates.
A good starting point seemed to be to calulcate the wheel frequency (using the Allan Staniforth method in his book Competition Car Suspension - great book by the way!).
My calculations were full of measurement errors, estimates, and assumptions, but I figured they'd still give me a reasonably good idea of what was going on.
The calculations suggested my wheel frequencies were around 130cpm on the front and 100cpm on the rear.
Staniforth suggests 80-100 cpm for a sportscar and 100-125 for a race car. He also suggests that the rear should be slightly higher than the front to enable it to catch up with the front over bumpy surfaces.
So that might explain a few things then!
At that point I decided to work through the calculations the other way to see what sort of spring rates I might actually want to start with.
After playing around I came to the conclusion that the rear needed to be around 100lbs higher than the front and that a good starting point would be 300lbs on the front and 400lbs on the rear, giving 115cpm front, and 130cpm rear.
As a quick and dirty test I decided to swap the front and rear springs giving me 250 on the front and 400 on the rear.
I've had it set like this for a few days and it's much much better! The fronts does feel a tad soft, but the tyre squeal and understeer have been eliminated, she feels far more composed on bumpy ground, and as an added bonus the front seems far less prone to locking under heavy breaking.
It's probably gone a little far the other way and is slightly tail happy now, but it's more fun like that :)
I still think 300 front / 400 rear will give a good balance and started looking for a new set of springs for the front.
I managed to find a pair of 325lb springs secondhand (but unused) for less than half the price of a pair of new 300lb springs and will hopefully get time to fit them next week.
That should still keep it slightly biassed towards the rear assuming my calculations aren't too far out!
I'll let you know how I get on.
----------------------------------------
UPDATE 30/09/2013:
I've been out a few times with the current spring rates (325lbs front / 400lbs rear), and I'm reasonably happy with them now. I'm certainly in no rush to change them again!
The car feels fairly well balanced front to rear now and goes into a nice controllable oversteer when provoked, which is what I was aiming for :)
The only thing I would say is that the ride is possibly a little too hard for some of the dodgy roads I drive on, and I *might* think about fitting softer springs next year.
Thursday 15 August 2013
Back in one piece - with new diff mounts
Took me a bit longer than planned, but the car's just about back together after my little incident with the diff.
Picked up a very orange replacement diff from Porkchop over on the Haynes forum.
Got some solid ali mounts to replace the rubber ones in the diff arms. These were supplied by Stot on the Haynes forum.
Got my propshaft repaired by Northwest Propshafts. This is where most of the delay occured.
The rear UJ got quite a battering when the diff broke and needed replacing. Initially they thought they might be able to repair the UJ, but it turned out to be unrepairable. So what they did was replace the rear UJ with a stronger, rebuildable one, and replace the whole shaft leaving only the front UJ and splined bit that goes into the gearbox as original.
When it turned up it didn't mate with the diff, as the nut on the end of the diff got in the way... They arranged for a courrier to pick it up though, and a week later it came back, and thankfully fitted just fine.
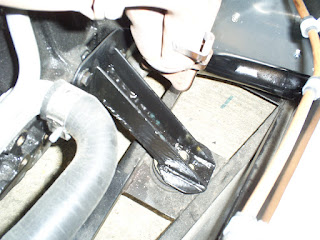
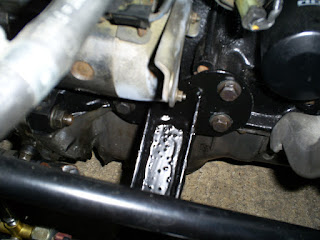
The other thing I did was fabricate a new front mount for the diff. It's similar to the old one, but 'chunkier' and solid-mounts to the chassis rather than using the landrover mounts:


I'm not particularly happy with the current diff mounting arrangement, but I'm sure it's better than my last one and will hopefully get me through what's left of the summer!
Just waiting for the roads to dry out now so I can have a bit of a shake down run.
UPDATE:
I've done 50 or so miles over the last couple of days. It's still on one piece and I can't say I've noticed any additional vibration.
I do miss the old LSD though. Pulling away doesn't feel quite as brutal with the new open diff!
Picked up a very orange replacement diff from Porkchop over on the Haynes forum.
Got some solid ali mounts to replace the rubber ones in the diff arms. These were supplied by Stot on the Haynes forum.
Got my propshaft repaired by Northwest Propshafts. This is where most of the delay occured.
The rear UJ got quite a battering when the diff broke and needed replacing. Initially they thought they might be able to repair the UJ, but it turned out to be unrepairable. So what they did was replace the rear UJ with a stronger, rebuildable one, and replace the whole shaft leaving only the front UJ and splined bit that goes into the gearbox as original.
When it turned up it didn't mate with the diff, as the nut on the end of the diff got in the way... They arranged for a courrier to pick it up though, and a week later it came back, and thankfully fitted just fine.
The other thing I did was fabricate a new front mount for the diff. It's similar to the old one, but 'chunkier' and solid-mounts to the chassis rather than using the landrover mounts:


I'm not particularly happy with the current diff mounting arrangement, but I'm sure it's better than my last one and will hopefully get me through what's left of the summer!
Just waiting for the roads to dry out now so I can have a bit of a shake down run.
UPDATE:
I've done 50 or so miles over the last couple of days. It's still on one piece and I can't say I've noticed any additional vibration.
I do miss the old LSD though. Pulling away doesn't feel quite as brutal with the new open diff!
Tuesday 23 July 2013
Teething Troubles...
Well 650 miles in and I've gone and broken it:

Not sure whether the rubber mounts or the diff broke first, but either way it's back to the drawing board...

Not sure whether the rubber mounts or the diff broke first, but either way it's back to the drawing board...
Friday 12 July 2013
Road Registered
Didn't mention on my last post, but on the way home from IVA I stopped by Peterborough DVLA office.
A very helpful chap there went through the paperwork with me, took a payment for tax and application fee, and inspected the car.
Two working days later (Monday this week) I got a letter containing my reg number and tax disc!
I got an age-related J-reg plate which was nice.
Took the car out for a damn good thrashing Monday night, and have been commuting in it all this week. Loving the unusually balmy weather :D
Thursday 4 July 2013
IVA Passed!!!!!!!!
Wooooooooooooooooo! I passed my IVA re-test today!
Here's what I had to do to get through:
1. Replace the slide pins on the dodgy rear caliper. One of them looked home-made, and not at all suitable...
2. Replace Rally Design's crappy forged coupling (RD820F) with a pressed steel type instead. Couldn't get the forged one to sit tight on the steering rack spline no matter how much I tightened the bolt up. I'm not the only person to have this problem either...
3. Delete my Mondeo rear brake bias valve to improve my overall braking efficiency. The rear brakes are quite weak on the MX5 and you don't need a valve to get trhough IVA.
4. Chop a half inch or so section out of the brackets that hold the end of the handbrake cables to the rear calipers and weld them back together so the cables clear the chassis. I raised the ride height a bit too just to be on the safe side.
5. Rotate my rear flexi line slightly so it didn't touch the chassis any more.
Though not on my fail sheet I also:
* Made the clutch pedal longer and replaced the master cylinder with a 0.625" one. The clutch was rediculously heavy and snappy before I did this. Still not great but vastly improved.
* Re-packed my exhaust with wire wool as the first lot blew out on the way home from my first test!
* Re-work the front wingstays to make them a bit stronger. One of them sheared off within hours of booking my re-test, and I had two evenings to re-make them!
Wednesday 26 June 2013
IVA Fail :(
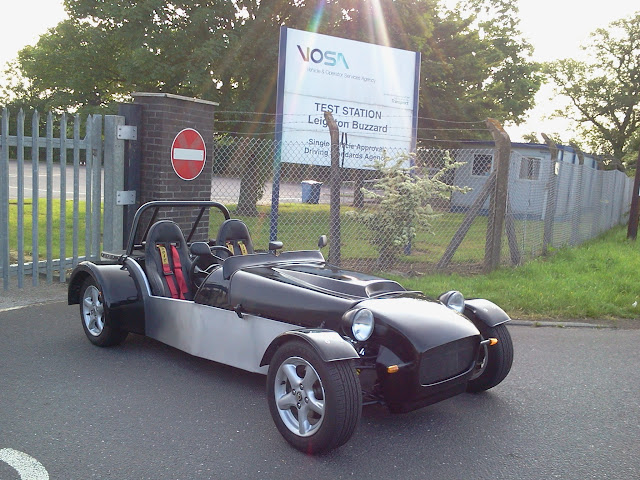
It was the big day for me yesterday.
Luckily I made it to the test centre in one piece, and with plenty of time to spare (I had my doubts about driving there, but she didn't miss a beat!).
Sadly a first time pass wasn't to be though
The car was tested by the main tester (Doug), his trainee, and a sort of supervisor that goes from centre to centre checking tests are done to the same standard. So it got quite a thorough looking over!
They are all good blokes, very friendly, and generally very positive about the car. The supervisor was a bit of an MX5 enthusiast so we had a good old natter on all things MX5.
First test was emissions, which passed without trouble (they were quite happy with the letter from Mazda for proof of engine age).
Next was interior/exterior projections, and a good look around the car.
They liked the fact I'd stuck lots of bits of rubber on there and couldn't find any nasty edges (unusual for Leighton Buzzard apparently!).
Next they stuck it on the ramps to check underneath. This is where it started going wrong...
They spotted one of the rear brake lines and both handbrake cables were rubbing on the chassis. They weren't last time I checked, so they must have settled/bedded-in during the drive there.
They also spotted there was a bit of play between the UJ and steering rack which they didn't like. I tried tightening it up, but there's still too much play.
The ramps came down and they checked all the lights. Head light aim was way off (and still is), but everything else was fine.
Interestingly they didn't seem to measure any heights or distances of the lights.
After that they weighed it then did the brake and speedo test.
The speedo over-read by quite a bit, but was still within IVA spec.
I'll come on to the brakes later...
Next test was exhaust noise, passed with a comfortable 95dB, followed by rear vision, which passed easily.
They liked my Furore e-marked IVA wing mirrors and the position of them saying a lot of people fail by putting them too low and getting too much rear wing in the way.
Next the trainee tester had a blat round the car park to do some more brake testing and to check self centering. Both were fine.
Finally they took a few measurements with a tape measure before disappearing into the office to enter all the figures into their spreadsheet.
Sometime later they emerged with my fail sheet...
This had the fails I knew about above, along with a fail for brake efficiency, and a fail for a big mismatch between each side on the handbrake.

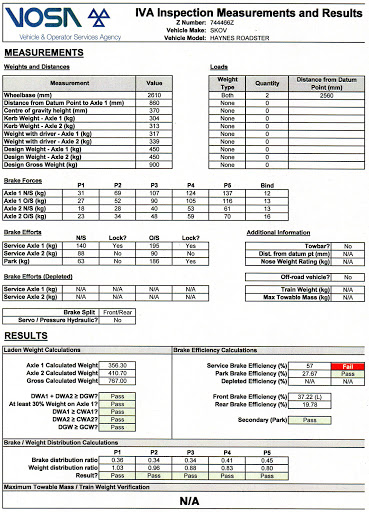
Not too bad a fail really.
Not quite sure what to do about the brakes yet, but the rest should be easy enough to fix.
Luckily I made it to the test centre in one piece, and with plenty of time to spare (I had my doubts about driving there, but she didn't miss a beat!).
Sadly a first time pass wasn't to be though
The car was tested by the main tester (Doug), his trainee, and a sort of supervisor that goes from centre to centre checking tests are done to the same standard. So it got quite a thorough looking over!
They are all good blokes, very friendly, and generally very positive about the car. The supervisor was a bit of an MX5 enthusiast so we had a good old natter on all things MX5.
First test was emissions, which passed without trouble (they were quite happy with the letter from Mazda for proof of engine age).
Next was interior/exterior projections, and a good look around the car.
They liked the fact I'd stuck lots of bits of rubber on there and couldn't find any nasty edges (unusual for Leighton Buzzard apparently!).
Next they stuck it on the ramps to check underneath. This is where it started going wrong...
They spotted one of the rear brake lines and both handbrake cables were rubbing on the chassis. They weren't last time I checked, so they must have settled/bedded-in during the drive there.
They also spotted there was a bit of play between the UJ and steering rack which they didn't like. I tried tightening it up, but there's still too much play.
The ramps came down and they checked all the lights. Head light aim was way off (and still is), but everything else was fine.
Interestingly they didn't seem to measure any heights or distances of the lights.
After that they weighed it then did the brake and speedo test.
The speedo over-read by quite a bit, but was still within IVA spec.
I'll come on to the brakes later...
Next test was exhaust noise, passed with a comfortable 95dB, followed by rear vision, which passed easily.
They liked my Furore e-marked IVA wing mirrors and the position of them saying a lot of people fail by putting them too low and getting too much rear wing in the way.
Next the trainee tester had a blat round the car park to do some more brake testing and to check self centering. Both were fine.
Finally they took a few measurements with a tape measure before disappearing into the office to enter all the figures into their spreadsheet.
Sometime later they emerged with my fail sheet...
This had the fails I knew about above, along with a fail for brake efficiency, and a fail for a big mismatch between each side on the handbrake.
Not too bad a fail really.
Not quite sure what to do about the brakes yet, but the rest should be easy enough to fix.
Monday 24 June 2013
IVA Tomorrow!
Less than a day to go now :O
Haven't done very much to the car for the last few weeks, just little tweaks here and there and adding random bits of trim.
I think I've done all I can realistically do to prepare now, so have to wait until tomorrow to see if it's enough.
Not really expecting a first time pass, but hopefully the list of things to fix won't be too long or difficult!
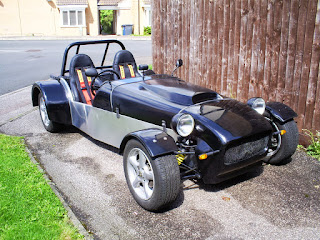
Here's some recent-ish pics:


Haven't done very much to the car for the last few weeks, just little tweaks here and there and adding random bits of trim.
I think I've done all I can realistically do to prepare now, so have to wait until tomorrow to see if it's enough.
Not really expecting a first time pass, but hopefully the list of things to fix won't be too long or difficult!
Here's some recent-ish pics:


Wednesday 12 June 2013
IVA Test Booked!
Leighton Buzzard test centre phoned me today to book me in for the IVA.
Got my test on the 25th June all being well, so less than two weeks to go, eek!
Got my test on the 25th June all being well, so less than two weeks to go, eek!
Wednesday 22 May 2013
VOSA Payment
VOSA just phoned to relieve me of my bank balance!
They recon it'll take two weeks to process the application and get back to me with a test date.
They recon it'll take two weeks to process the application and get back to me with a test date.
Monday 20 May 2013
IVA Application
Sent off my IVA application today. Not at all pooing myself now!!!
I had intended to do this two weeks ago, but whilst checking the car over I realised I had a coolant leak, an oil leak, a seized rear calliper and a leaking CV boot!!!
They're all (hopefully!) fixed now so I should be close enough to get the car ready in time.
The oil leak appeared to be coming from the cam seals, I'd already replaced them once, but the shafts have grooves in them where the seals sit. Had a dig around in my spares and found a couple of sets, one of which was a slightly tighter fit and seals sightly further down the shaft so I went for those ones.
The water leak was because I didn't use any sealant when I fitted my new waterpump. The sealing face on the block was a bit corroded and the gasket is a fag paper thin metal one. Re-fitted with some hi temp silicon and so far so good!
Rear caliper had a dodgy handbrake mechanism. I'd already replaced both rears once, but with second hand ones... Fitted a new one on the side that had stuck.
Replacing the CV boot wasn't too bad, but getting the $%&^$£^ shaft off was a ^£$^%$^!!!
I've been crap at updating my blog, but I've also done loads of other little bits and bobs recently, like painting my bonnet, wingstays, and front wings, fitting various bits of IVA trim, and adjusting/bolting things down properly (in the hope I won't have to take them off again any time soon!).

Saturday 27 April 2013
Front Wing Stays
Knocked up a couple of wing stays / brackets for the front cycle wings recently.
They're made from 3mm steel strip, 3mm plate, and some round tubes from an old bed frame :)
They mount to the top ball joint and one of the caliper mounting bolts:


They're made from 3mm steel strip, 3mm plate, and some round tubes from an old bed frame :)
They mount to the top ball joint and one of the caliper mounting bolts:


Lock Stops Mk2
My first attempt at limiting the steering travel failed miserably.
The jubilee clips took a battering and broke before the car even left my garage!
My second attempt is a little more robust and uses a pair of shaft clamps from RS components (part no 691-8124):


Hopefully these will last a bit longer!
---------
UPDATE: I had to ditch the stop on the drivers side as it restricted the steering far too much.
Ended up just laying down a couple of carefully placed welds on the rack instead...
Sunday 14 April 2013
Nearly done?
Just a little progress pic:

I think I might be getting dangerously close to being ready for IVA now.
Just need to make the front wingstays, paint the bonnet, and add a load of trim!
I even made myself a temporary plate out of cardboard for test day :)


I think I might be getting dangerously close to being ready for IVA now.
Just need to make the front wingstays, paint the bonnet, and add a load of trim!
I even made myself a temporary plate out of cardboard for test day :)

Flasher Modification
One thing I noticed when checking the dash lights is that my indicators were flashing too fast for IVA.
This is due to my indicators drawing less current than the MX5 ones and cauing the flasher to think one of the lights had blown.
The usual solution is to add ballast resistors, but it's not particularly elegant, and by the time I noticed I'd already taped up my wiring loom and didn't fancy chopping into it again.
After a bit of googling I found this site which details how to modify the MX5 flasher to work with LED indicators:
http://forum.miata.net/vb/showthread.php?t=335534
All it involves is swapping a resistor (hope the guy doesn't mind me nicking his picture):

In fact the mod was even simpler than that; all I did was remove the resistor and not bother replacing it at all.
I figured a 1Meg resistor probably wasn't doing much anyway so tried without and it worked just fine :)
Saturday 30 March 2013
Dash Wiring
I got my dash wired up over the last couple of evenings:


The wires are all wrapped in self amalgamating tape, and held in place with cable-tie saddles screwed to the dash with self tappers.
In the middle of the dash are the mini clocks.
Just below them is my VRS-to-digital interface for the speed signal.
To the left are the hazard and fog switches, and a relay I had to add to invert the hazard signal.
To the right are my CAN interface modules to take the various signals from the car and generate CAN messages for the mini clocks.
Plugged it into the car and most things seem to work!
Need to do a small tweak to the RPM, as currently it's displying twice the engine speed!
The brake warning isn't quite working. Turns out the brake sensor is 500 Ohms when off - hadn't expected it to be anything like that, so will need to reduce the value of my pull-up resistor for that input.
Haven't tested the speed yet, but don't expect the scaling to be anything like correct!
The only other thing I'm not sure about is the fuel level. It's currently displaying as 1% full with about 10l of fuel in the tank, so that might need some futher investigation.
---------
UPDATE:
I spent some more time on this over the bank holiday weekend, and all the dash functions now work :) (except possibly vehicle speed which I haven't yet checked).
Adding a 1k pull-up to 12V to the brake warning signal fixed that problem.
Tweaked the code to fix the double RPM issue.
I've left the fuel level as is for now. It sort of works, in that it's fairly accurate at full tank and empty tank. The problem is that my code assumes a linear voltage from empty to full, but in reality it's curved. I might add some code to linearise the signal at some point, but it'll do for now.
Whilst testing I spotted that my indicator tell-tales weren't keeping up with the indicators, but just sending the CAN messages to the clocks more frequently fixed that.
Also noticed my charge warning light was permanently on. That needed a 120 Ohm pull-up with a diode in series adding. Not sure why, but it appears that alternators need quite a strong pull-up resistor on the charging light wire to actually initiate charging.
Saturday 23 March 2013
Fuse Box Cover
More sewing. This time to cover my fuse box and relays.
Using my usual method of vinyl, scrim foam, and bias binding.

Using my usual method of vinyl, scrim foam, and bias binding.

IVA seat belt end/nut covers
Whipped these up on the sewing machine for IVA:


They're vinyl with scrim foam glued on the back and a bit of bias binding around the edges.


They're held on with a single press stud.


They're vinyl with scrim foam glued on the back and a bit of bias binding around the edges.

They're held on with a single press stud.
Engine Mounts Completed
Finally got around to finishing off my engine mounts.
All they needed was the welding finishing off, a bit of shaping with the angry grinder and a few poorly applied coats of paint.


All they needed was the welding finishing off, a bit of shaping with the angry grinder and a few poorly applied coats of paint.


Fog Light Wedge
Made a wegde for my foglight this week to correct it's vertical position for IVA:

Made it out of a chunk of balsa wood I had lying around from my RC plane days.
Shaped and sanded, then added a couple of coats of spray paint. Simples :)

Made it out of a chunk of balsa wood I had lying around from my RC plane days.
Shaped and sanded, then added a couple of coats of spray paint. Simples :)
Sunday 10 March 2013
Interior Trim and Seats
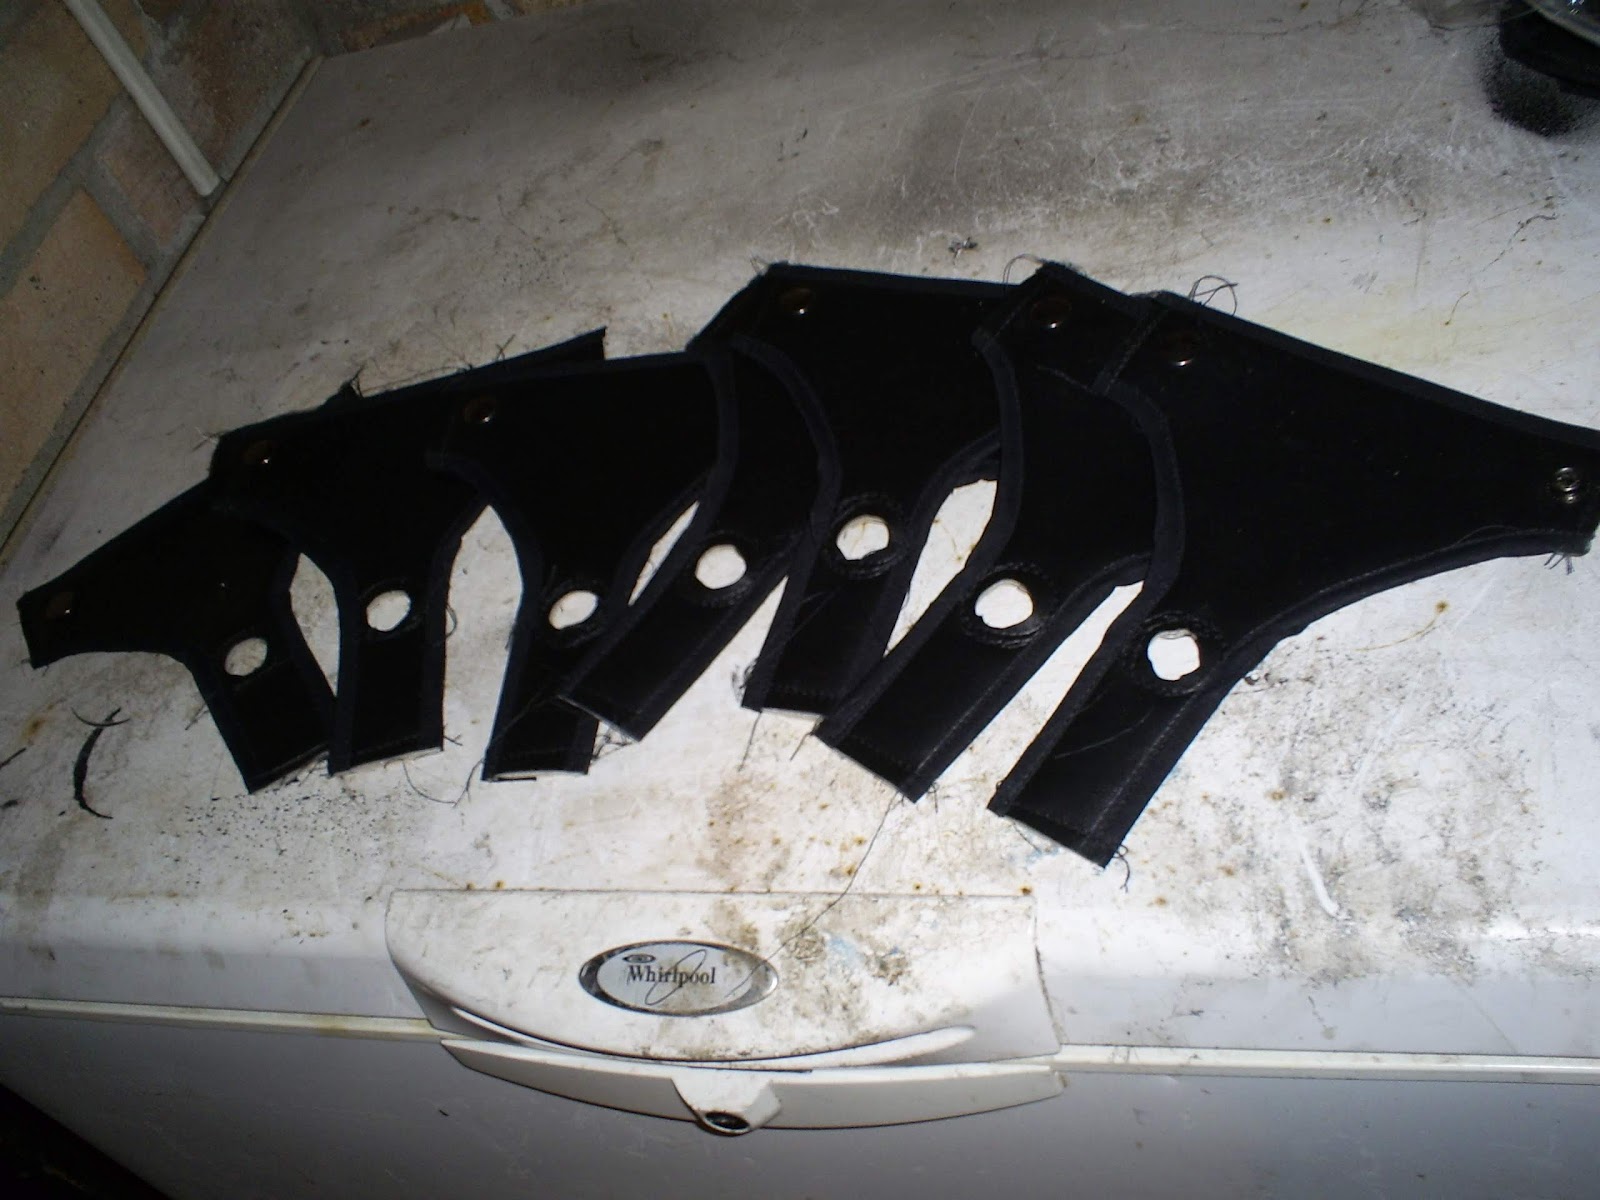
This week I've been getting in touch with my feminine side and spending some quality time with the sewing machine.
A few weeks back I did a little experiment and made a couple of these panels to fill in the gaps between the chassis rails:

I wasn't sure at the time, but it's grown on me a bit and I thought I may as well make some more, along with a cover for the tranny tunnel.
Whilst I was at it, I made gaitors for the handbrake and gearstick.


The panels are made from vinyl / leatherette glued to 2 layers of 3mm scrim foam using a can of spray contact adhesive. One layer of 3mm foam wasn't enough to make the diamonds puff out!
I should have used 6mm or thicker foam in the first place, but I'd already bought several meters of 3mm stuff...
When I'd finished making the vinyl/foam sandwich I marked out the diamond pattern on the back and went over the lines with the sewing machine.
Finally, I stiched cotton bias binding around the edges of the panels.
I also finished fitting my seats last night. They're Cub Sport L7 seats from Kit Parts Direct.
I decided to treat myself to a pair after getting peed off trying to get my first set of cheapo plastic seats to fit.


A few weeks back I did a little experiment and made a couple of these panels to fill in the gaps between the chassis rails:
I wasn't sure at the time, but it's grown on me a bit and I thought I may as well make some more, along with a cover for the tranny tunnel.
Whilst I was at it, I made gaitors for the handbrake and gearstick.
The panels are made from vinyl / leatherette glued to 2 layers of 3mm scrim foam using a can of spray contact adhesive. One layer of 3mm foam wasn't enough to make the diamonds puff out!
I should have used 6mm or thicker foam in the first place, but I'd already bought several meters of 3mm stuff...
When I'd finished making the vinyl/foam sandwich I marked out the diamond pattern on the back and went over the lines with the sewing machine.
Finally, I stiched cotton bias binding around the edges of the panels.
I also finished fitting my seats last night. They're Cub Sport L7 seats from Kit Parts Direct.
I decided to treat myself to a pair after getting peed off trying to get my first set of cheapo plastic seats to fit.
Thursday 7 March 2013
ECU Cover
Knocked up a dodgy cover for the ECU this week to keep the IVA man's balls away from it :)


It's just a sheet of ali with some trim down the edges, bolted to a bit of ali angle on the floor, and a chassis rail at the top.
I also added three press studs to it at the top. My intention is to make a fabric/foam cover for the relays and fuse box which will attach to this (and also cover it's sharp top/leading edge).
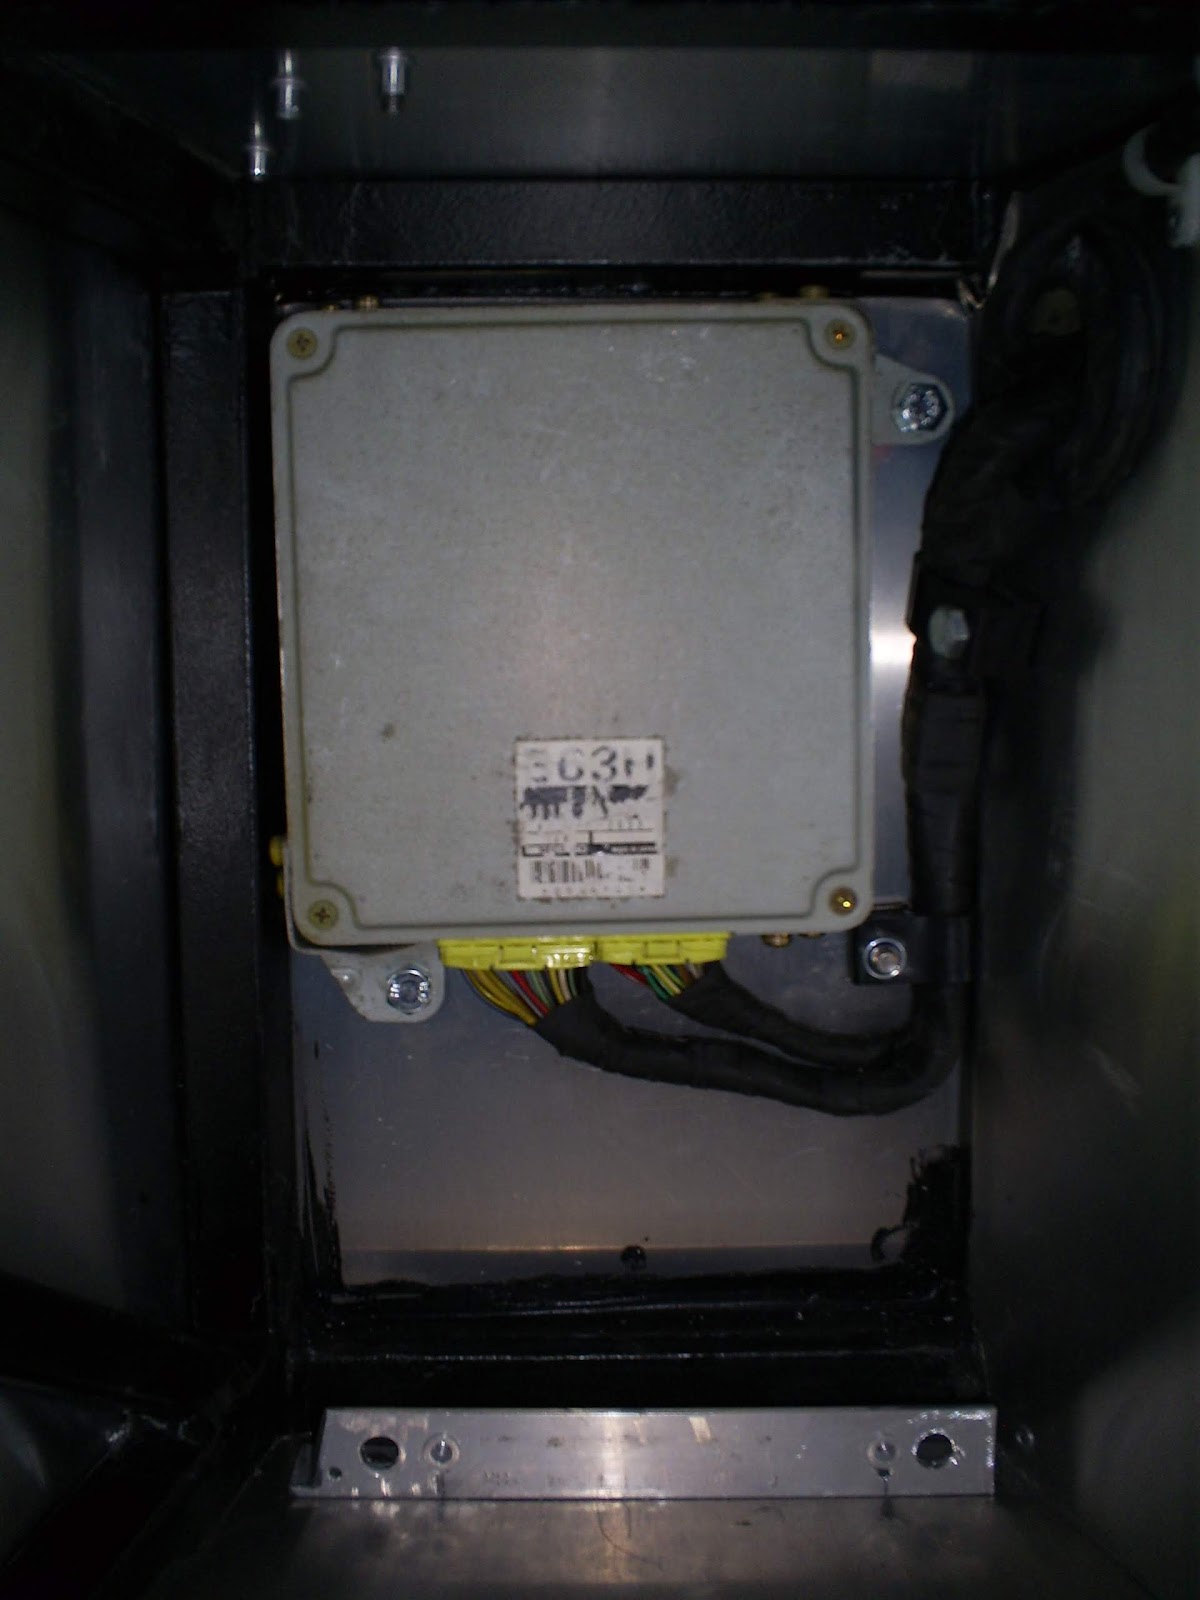
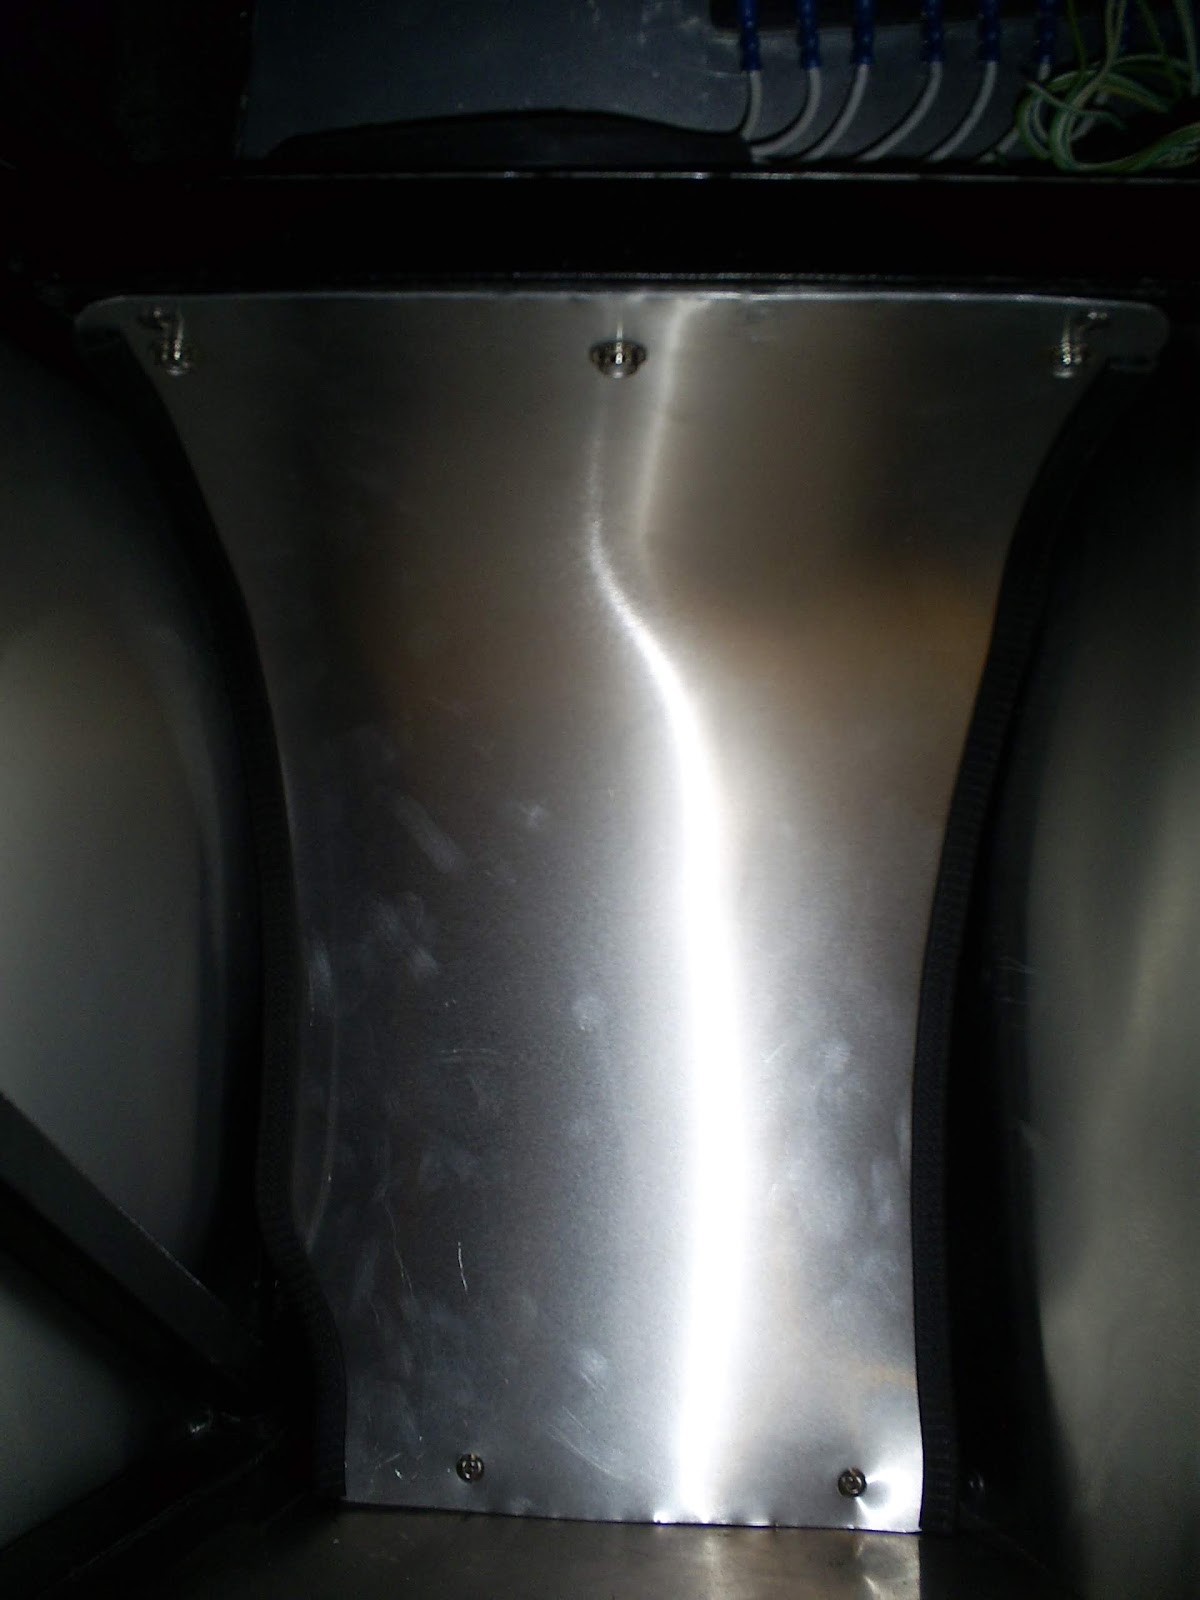
Subscribe to:
Posts (Atom)